
Fragment는 생각만 하면 머리가 아파오지만 안드로이드의 필수적인 기능임은 틀림없습니다. 하지만 화면 전환을 할 때만 되면 골치 아파지죠, 특히 프래그먼트간 전환을 할 때입니다.
기존 액티비티에서 프래그먼트로 이동할 때 FragmentManager()를 이용했습니다. 그리고 프래그먼트 간 전환을 하기 위해 우린 상위 액티비티에서 전환 이벤트를 전부 구현해줘야 했습니다.
Activity to Fragment, Fragment to Fragment
Fragment란? 사전적 의미로 Fragment란 조각을 의미한다. 우리가 앱을 개발하다보면 액티비티에 부분적인 화면을 추가하고 싶을 때가 있다. 특히, 한 액티비티에서 여러 화면이 전환되게 만들고 싶을
huzit.tistory.com
이런 불편하고 까다로운 프래그먼트 이동을 안드로이드에서 제공하는 Navigation을 이용하여 간단하게 관리해 보도록 하겠습니다.
의존성
dependencies{
    //navigation
    def nav_version = "2.5.3"
    implementation "androidx.navigation:navigation-fragment-ktx:$nav_version"
    implementation "androidx.navigation:navigation-ui-ktx:$nav_version"
    implementation "androidx.navigation:navigation-dynamic-features-fragment:$nav_version"
    //Test Navication
    androidTestImplementation "androidx.navigation:navigation-testing:$nav_version"
}
Navigation 의존성입니다. 기본적인 골조는 developer사이트와 동일합니다.
아래의 의존성은 프래그먼트간 전환 시 안드로이드에서 권장하고 있는 Safe Args Gradle 플러그인의 의존성입니다.
Safe Args 플러그인은 모든 연결된 인수에 타입 안전성을 갖춘 탐색 및 액세스를 하기 위한 간단한 객체 및 빌더 클래스를 생성합니다. Safe Args는 유형 안정성을 보장하므로 데이터를 탐색하고 전달할 때는 Safe Args를 사용하는 것이 좋습니다.
만일 Gradle를 사용하지 않는 일부 경우, 번들을 사용하여 직접 데이터를 전달하면 됩니다.
⬇️build.gradle(Project)
plugins {
    id 'com.android.application' version '7.4.2' apply false
    id 'com.android.library' version '7.4.2' apply false
    id 'org.jetbrains.kotlin.android' version '1.8.0' apply false

    id 'androidx.navigation.safeargs.kotlin' version '2.5.3' apply false
}
프로젝트 레벨의 build.gradle에 추가하면 됩니다.
⬇️build.gradle(Module:app)
plugins {
    id 'com.android.application'
    id 'org.jetbrains.kotlin.android'

    id 'androidx.navigation.safeargs.kotlin'
}
모듈 레벨의 build.gradle에 추가하면 됩니다.
화면 설계
⬇️activity_main.xml
<?xml version="1.0" encoding="utf-8"?>
<androidx.constraintlayout.widget.ConstraintLayout
    xmlns:android="http://schemas.android.com/apk/res/android"
    xmlns:tools="http://schemas.android.com/tools"
    xmlns:app="http://schemas.android.com/apk/res-auto"
    android:layout_width="match_parent"
    android:layout_height="match_parent"
    tools:context=".MainActivity">

    <androidx.fragment.app.FragmentContainerView
        android:id="@+id/fragmentContainer"
        app:layout_constraintTop_toTopOf="parent"
        app:layout_constraintStart_toStartOf="parent"
        android:layout_width="match_parent"
        android:layout_height="match_parent"
        app:layout_constraintBottom_toTopOf="@+id/bottomNav"

        android:name="androidx.navigation.fragment.NavHostFragment"
        app:navGraph = "@navigation/navigation_all"
        />

    <com.google.android.material.bottomnavigation.BottomNavigationView
        android:id="@+id/bottomNav"
        app:layout_constraintStart_toStartOf="parent"
        app:layout_constraintBottom_toBottomOf="parent"
        app:menu="@menu/main_menu"
        android:layout_width="match_parent"
        android:layout_height="wrap_content"/>

</androidx.constraintlayout.widget.ConstraintLayout>
메인 레이아웃이 가장 중요합니다. FrameLayout가 아니라 FragmentContainerView를 사용해서 프래그먼트를 보여주는 방식입니다.
공식문서에 나와있는 것처럼 name속성에 NavHostFragment를 넣어주고 navGraph속성에 이다음에 생성할 내비게이션 파일의 id를 넣어주면 됩니다.
navGraph속성은 자동완성을 지원하지 않으므로 직접 입력해줘야 합니다. 저처럼 자동완성 안된다고 의존성이 제대로 주입 안 됐구나 하며 헤매면 오랜 시간 해멜 수 있습니다.
⬇️main_menu.xml
<?xml version="1.0" encoding="utf-8"?>
<menu xmlns:android="http://schemas.android.com/apk/res/android">
    <item
        android:id="@+id/mainFragment"
        android:title="홈"
        android:enabled="true"
        />
    <item
        android:id="@+id/subFragment"
        android:title="서브"
        android:enabled="true"
        />
</menu>
바텀 내비게이션에 들어갈 아이템 레이아웃입니다. 여기서 중요한 점은 아이템의 id에 이동하려는 화면의 id값을 적어줘야 합니다. 그렇지 않을 경우 맵핑이 안됩니다.
⬇️fragment_main.xml
<?xml version="1.0" encoding="utf-8"?>
<androidx.constraintlayout.widget.ConstraintLayout
    xmlns:android="http://schemas.android.com/apk/res/android"
    xmlns:app="http://schemas.android.com/apk/res-auto"
    xmlns:tools="http://schemas.android.com/tools"
    android:layout_width="match_parent"
    android:layout_height="match_parent"
    tools:context=".MainFragment">

    <TextView
            android:textSize="20sp"
            android:layout_width="match_parent"
            android:layout_height="match_parent"
            android:text="HomeFragment"
            android:id="@+id/textView2"/>

    <Button
            android:id="@+id/mainNextButton"
            android:layout_width="wrap_content"
            android:layout_height="wrap_content"
            android:text="다음 화면"
            app:layout_constraintEnd_toEndOf="parent"
            app:layout_constraintStart_toStartOf="parent"
            app:layout_constraintTop_toTopOf="parent"
            app:layout_constraintBottom_toBottomOf="parent"/>

</androidx.constraintlayout.widget.ConstraintLayout>
⬇️fragment_another
<?xml version="1.0" encoding="utf-8"?>
<androidx.constraintlayout.widget.ConstraintLayout xmlns:android="http://schemas.android.com/apk/res/android"
    xmlns:app="http://schemas.android.com/apk/res-auto"
    xmlns:tools="http://schemas.android.com/tools"
    android:layout_width="match_parent"
    android:layout_height="match_parent"
    tools:context=".AnotherFragment">

    <TextView
        android:textSize="20sp"
        android:layout_width="match_parent"
        android:layout_height="match_parent"
        android:text="AnotherFragment"
        android:id="@+id/textView2"/>

    <Button
        android:id="@+id/anotherButton"
        android:layout_width="wrap_content"
        android:layout_height="wrap_content"
        android:text="이전 화면"
        app:layout_constraintEnd_toEndOf="parent"
        app:layout_constraintStart_toStartOf="parent"
        app:layout_constraintTop_toTopOf="parent"
        app:layout_constraintBottom_toBottomOf="parent"/>

</androidx.constraintlayout.widget.ConstraintLayout>
⬇️fragment_sub.xml
<?xml version="1.0" encoding="utf-8"?>
<androidx.constraintlayout.widget.ConstraintLayout
    xmlns:android="http://schemas.android.com/apk/res/android"
    xmlns:tools="http://schemas.android.com/tools"
    android:layout_width="match_parent"
    android:layout_height="match_parent"
    xmlns:app="http://schemas.android.com/apk/res-auto"
    android:id="@+id/subFragment"
    tools:context=".SubFragment">


    <TextView
        android:textSize="20sp"
        android:layout_width="match_parent"
        android:layout_height="match_parent"
        android:text="subFragment" />

    <Button
            android:id="@+id/subButton"
            android:layout_width="wrap_content"
            android:layout_height="wrap_content"
            android:text="다음 화면"
            app:layout_constraintTop_toTopOf="parent"
            app:layout_constraintStart_toStartOf="parent"
            app:layout_constraintEnd_toEndOf="parent"
            app:layout_constraintBottom_toBottomOf="parent"
            />

</androidx.constraintlayout.widget.ConstraintLayout>
남은 레이아웃은 별거 없습니다. 현재 화면을 알려주는 텍스트 뷰와 화면전환버튼이 전부입니다.
내비게이션 생성
내비게이션. xml의 생성 절차입니다.
내비게이션에서 할 일은 2가지입니다.
- 프래그먼트간 방향 설정하기
- 프래그먼트의 인수 정의하기
우선 생성 방법입니다
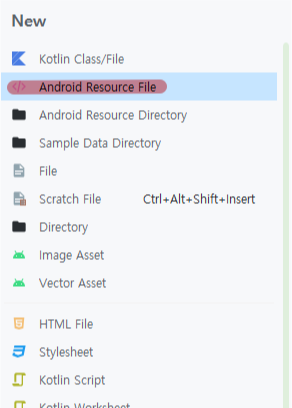
res -> 마우스 우클릭 new -> Android Resource File
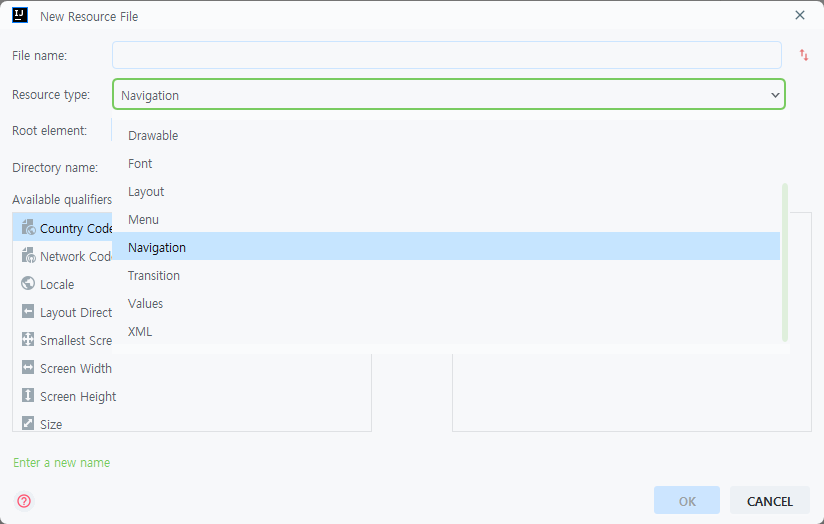
내비게이션의 이름을 설정하고 생성하면 됩니다
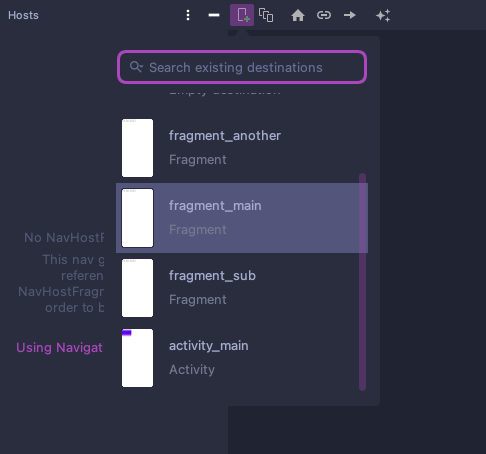
현재 생성한 화면들을 내비게이션에 추가할 수 있습니다. 다 추가해 줍시다.
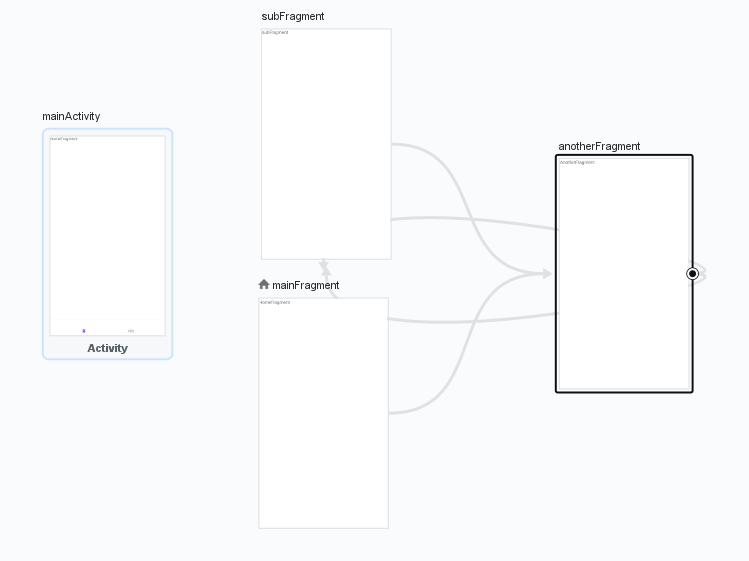
화살표를 다른 프래그먼트로 드래그해서 프래그먼트의 방향을 설정할 수 있습니다.
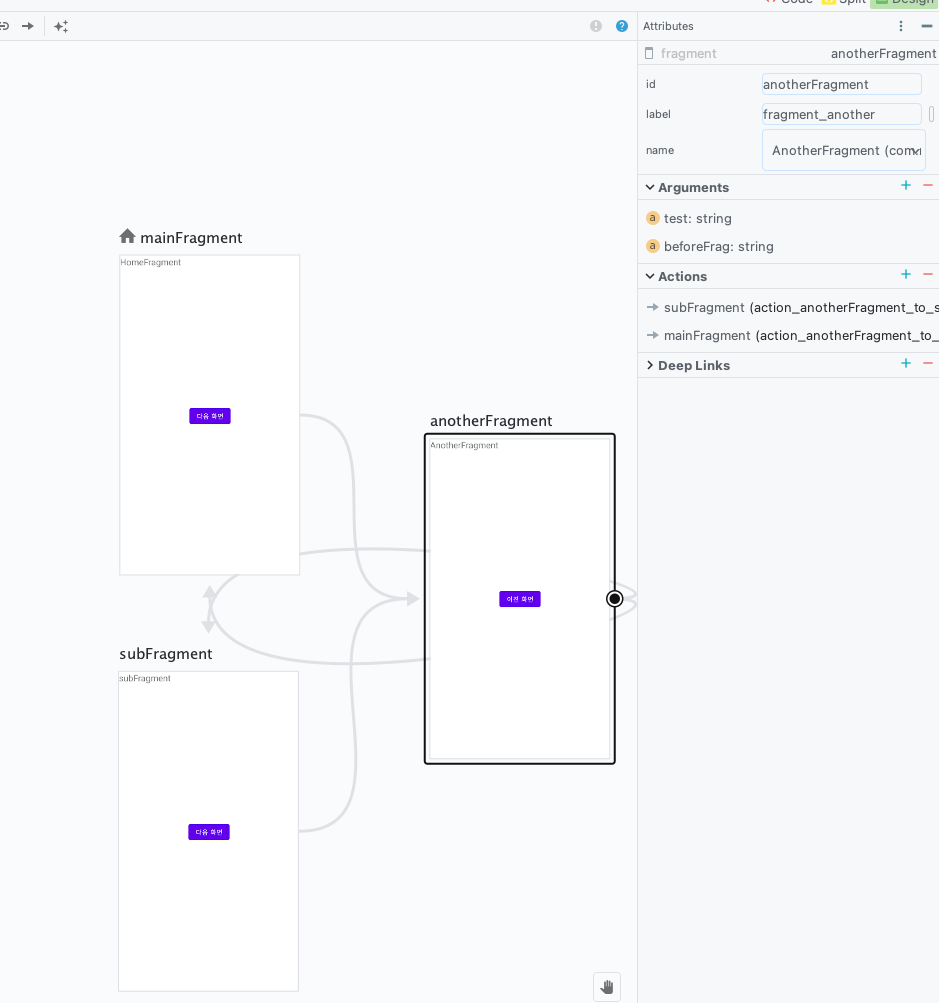
anotherFragment를 클릭하시면 Arguments 칸에 인수를 넣을 수 있습니다.
Toast 메시지로 띄울 Test 변수와 이전 화면이 어디였는 지를 알려줄 beforeFrag 변수를 정의해 줍니다.
코드
MainActivity
class MainActivity : AppCompatActivity() {
lateinit var binding: ActivityMainBinding
override fun onCreate(savedInstanceState: Bundle?) {
super.onCreate(savedInstanceState)
initBind()
setBottomNav()
}
//바인딩
private fun initBind(){
binding = ActivityMainBinding.inflate(layoutInflater)
setContentView(binding.root)
}
//바텀 네비 설정
private fun setBottomNav(){
//FragmentContainerView를 NavHostFragment로 가져옴
val navHostFragment = supportFragmentManager.findFragmentById(R.id.fragmentContainer) as NavHostFragment
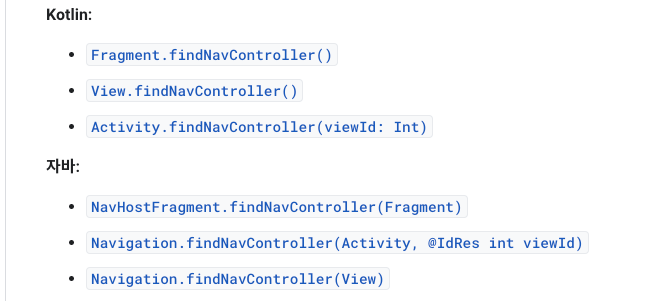
//바텀 네비게이션에 들어갈 네비게이션 컨트롤러 정의
val navController = navHostFragment.findNavController()
binding.bottomNav.setupWithNavController(navController)
}
}메인 액티비티에서 하는 일은 바텀 내비게이션의 컨트롤러를 정의 및 할당하는 것 밖에 없습니다.
MainFragment
class MainFragment : Fragment() {
    //프래그먼트 뷰 바인딩
    var _binding: FragmentMainBinding? = null
    val binding: FragmentMainBinding
        get() = _binding!!

    override fun onCreateView(
        inflater: LayoutInflater, container: ViewGroup?,
        savedInstanceState: Bundle?
    ): View? {
        //화면을 바인딩에 올려 줌
        _binding = FragmentMainBinding.inflate(inflater, container, false)
        return binding.root
    }

    override fun onViewCreated(view: View, savedInstanceState: Bundle?) {
        super.onViewCreated(view, savedInstanceState)
        setButton()
    }

    fun setButton(){
        binding.mainNextButton.setOnClickListener {v ->
            //navigation에 추가한 argument 타입에 따라 데이터 전달 가능
            val amount = "From MainFragment"
            val t = "MainFragment"
            val action = MainFragmentDirections.actionMainFragmentToAnotherFragment(amount, t)
            //화면 전환 액션
            v.findNavController().navigate(action)
        }
    }

    override fun onDestroyView() {
        super.onDestroyView()
        //메모리 누수 방지를 위해 null 할당
        _binding = null
    }
}
화면 바인딩 이후 setButton() 함수에서 버튼의 기능을 정의합니다.
MainFragmentDirections은 Safe Args 플러그인이 자동으로 만든 발신 대상의 클래스입니다. 여기서 선언한 함수를 보면 수신 대상이 적혀있는 전환 함수가 있습니다. 아까 전에 내비게이션에서 넣어줬던 AnotherFragment의 인수 2개를 넣어줍니다.
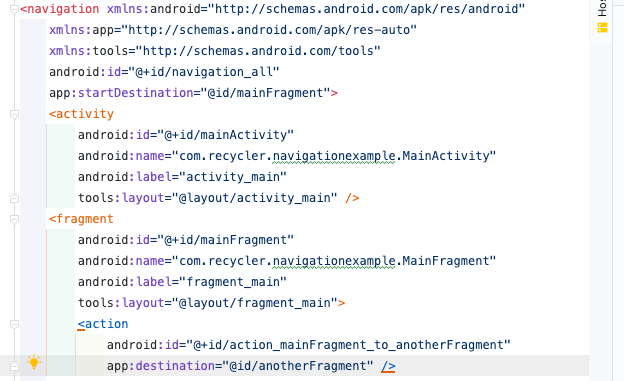
내비게이션 코드를 직접 보면 <action> 태그로 해서 id와 목적지가 정의된 것을 알 수 있습니다.
마지막으로 메모리 누수를 방지하기 위해 바인딩된 화면에 null을 넣어줍니다.
메모리 누수가 일어나는 이유에 대해 간단 요약하자면 프래그먼트 생명주기가 액티비티의 것보다 길어서 backstack이나 detach를 사용하게 된다면 FragmentContainerView는 사라지지만 Fragment는 남는 기이한 현상이 생기므로 onDestroyView에서 null을 할당해 준다
SubFragment
class SubFragment : Fragment() {
    val binding: FragmentSubBinding
        get() = _binding!!
    var _binding: FragmentSubBinding? = null
    override fun onCreateView(
        inflater: LayoutInflater, container: ViewGroup?,
        savedInstanceState: Bundle?
    ): View? {
        _binding = FragmentSubBinding.inflate(inflater, container, false)
        return binding.root
    }

    override fun onViewCreated(view: View, savedInstanceState: Bundle?) {
        super.onViewCreated(view, savedInstanceState)
        setButton()
    }

    fun setButton(){
        binding.subButton.setOnClickListener {v ->
            val amount = "From SubFragment"
            val t = "SubFragment"
            val action = SubFragmentDirections.actionSubFragmentToAnotherFragment(amount, t)
            v.findNavController().navigate(action)
        }
    }
}
MainFragment와 같은 기능을 하고 있으므로 코드는 동일합니다.
여기서 유의 깊게 봐야 하는 점은 Directions 클래스의 이름이 다른 것과 action을 정의하고 있는 메서드 명이 다른 것입니다. MainFragment와 확연히 다른 것을 볼 수 있습니다.
AnotherFragment
class AnotherFragment : Fragment() {

    var _binding: FragmentAnotherBinding? = null
    val binding: FragmentAnotherBinding
        get() = _binding!!
    //전달된 변수를 받기위한 매개변수
    val args: AnotherFragmentArgs by navArgs()

    override fun onCreateView(
        inflater: LayoutInflater,
        container: ViewGroup?,
        savedInstanceState: Bundle?
    ): View? {
        _binding = FragmentAnotherBinding.inflate(inflater, container, false)
        return binding.root
    }

    override fun onViewCreated(view: View, savedInstanceState: Bundle?) {
        super.onViewCreated(view, savedInstanceState)
        Toast.makeText(requireContext(), args.test, Toast.LENGTH_SHORT).show()
        setButton()
    }

    fun setButton(){
        binding.anotherButton.setOnClickListener {v ->
            when(args.beforeFrag){
                "MainFragment" -> {
                    val action = AnotherFragmentDirections.actionAnotherFragmentToMainFragment()
                    v.findNavController().navigate(action)
                }
                "SubFragment" -> {
                    val action = AnotherFragmentDirections.actionAnotherFragmentToSubFragment()
                    v.findNavController().navigate(action)
                }
            }
        }
    }

    override fun onDestroyView() {
        super.onDestroyView()
        _binding = null
    }
}
이전 Fragment에서 전달받은 함수를 사용하기 위해 args 변수를 선언해 줍니다.
버튼에선 args에 넘어온 becoreFrag의 값에 따라 분기처리를 해줍니다.
결과
화면 전환과 분기처리가 잘 된 것을 볼 수 있습니다.

오래전에 사용하던 방법에 비해서 간결함이나 효율성이 엄청나게 증가했는데 앞으로는 (컴포즈에서 어떻게 될지 모르지만) Navigation만 쓸 거 같습니다.
참고
탐색 구성요소 시작하기 | Android 개발자 | Android Developers
탐색 구성요소 시작하기 컬렉션을 사용해 정리하기 내 환경설정을 기준으로 콘텐츠를 저장하고 분류하세요. 이 주제는 탐색 구성요소를 설정하고 사용하는 방법을 설명합니다. 탐색 구성요소
developer.android.com
Jetpack Navigation Graph로 bottom navigation 설정하기
Jetpack Navigation Graph를 이용해 bottom navigation 만드는 방법
velog.io
'안드로이드 > Activity & Fragment' 카테고리의 다른 글
| Navigation의 백스택을 관리해보자 (0) | 2023.04.26 |
|---|---|
| OnClick 이벤트 설정하는 방법 (0) | 2022.07.15 |
| Activity to Fragment, Fragment to Fragment (0) | 2022.06.13 |